Wednesday, February 29, 2012

Button Monogram Pillow

Being a newlywed, I am slightly obsessed with monograms. Particularly, my new one! Unfortunately, my darling hubby does not share my love of monograms. He calls them "the letters" & actively vocalizes how much he dislikes them. As you all know from my post For My Deer-est, I try to take into account both of our likes & dislikes when I'm planning projects, & ultimately when I decorate our house. But, this is one major exception! I saw this blog post on Pinterest about a monogramed button pillow, & I knew I had to make one for myself!


A few months ago, my awesome mother-in-law gave me her old sewing machine (which was originally her mother-in-law's as well!). We (Micah helped) finally got it up & running, so I've been chomping at the bit for a sewing project. I stumbled upon a great deal at Target the other day while I was aimlessly looking around. They had a whole aisle dedicated to curtains on sale, & I found this amazing Shabby Chic curtain for $13!  I have VERY big plans for this curtain, but we will cover more about that in a later post.


I love the burlap look of it! I decided my first project with it was going to be making a button pillow. So, I made a trip to my local JoAnn's & picked up the necessities. After some browsing, I found a box of assorted buttons, which was just what I was looking for. You could also get buttons in the same hue or color family, but I wanted an eclectic mix. I also picked up some thread... as a sewing beginner, my supplies are seriously lacking. I found a very helpful blog for sewing newbies like myself that outlined what you need. She recommended a high quality thread, like Gutterman Natural Cotton Thread, in a neutral color. The natural cotton is a little pricy, so I went with a spool of the polyester in Col. 512.


Once I had those two key items, I got started on the design. First, I unpacked my curtain & figured out the size I wanted my pillow to be. I measured a throw pillow that came with our couch to gauge what I wanted mine to be. It was 17"x17", so I measured out & cut my fabric at 18"x18" to give myself some leeway while I was sewing it up. My squares were all wrinkled from being folded in packaging, so I went ahead & ironed them before I started anything else.


Then, I found a K that I liked by searching on Google (of course!). I enlarged & printed it out, but it wasn't quite as big as I wanted so I freehanded the same K on a blank sheet of paper. I cut it out to create a template, pinned it to the center of my fabric, & traced it with a pencil. A pencil wasn't necessarily the best thing to use, since the lines are still faintly visible, but I was working with what I had. I think I'm going to invest in a few Pilot Frixion pens that have ink that disappears when heated with an iron, as is also suggested in the sewing beginners blog post.


Once I had a pattern to follow, I got to work! I started out by picking a few buttons I liked & arranging them on the K, starting in the center. From there, I worked my way out along the rest in small sections, hand stitching the buttons. I tried to mix the colors & sizes of the buttons up. It doesn't matter if it looks perfect either... believe me, its impossible to get it perfect! To make things a little easier, I doubled up my thread on my needle so I could cut down on how many times I stitched through the button holes without worrying about the buttons not being secure.


I'm not going to lie.... this process is SLOW, but remember the classic story about the Tortoise and the Hare. My patience most definitely paid off! (And your's will too!)


Once I was satisfied with my finished monogram, I pinned the two pieces of fabric together. (Remember to do that with the buttons facing in - VIP!) I used my same thread to sew with my machine as well. Now remember, this is my very first sewing project with a machine (eeek!), so I'm not really going to go into all the details, because I am by no means an expert. I was just excited that my stitches weren't completely wonky! I sewed up 3 of the sides completely, & then did about 3/4 of the 4th side (This is so I can stuff the pillow & hand stitch the little hole up). I made sure I left the gap on the bottom of my pillow so it would be less noticeable.


I stuffed the pillow with Poly-Fil that I also got from JoAnn's & stitched up the hole. Voila!! A brand-spanking-new monogramed pillow! All in all, this little project cost me about $25 to make... but I will also be using the same fabric for a few other projects. I am pretty much in love with my pillow, & I'm pretty proud of myself (if I do say so myself) for my first sewing project! I hope y'all like it as much, too. :)


Monday, February 20, 2012

Personalized Save the Date Sign

I decided to post about one of my most favorite things that I've made... a "Save the Date" sign that Micah & I used in our engagement photos! I made this last summer, so once again, there are no step-by-step picture, but I feel like this is a pretty straightforward project. 
The finished product!
I started out by making a trip to Hobby Lobby for my supplies. I looked in the unfinished wood aisle for a plaque, but I wasn't satisfied with the sizes... I wanted something bigger. So then I headed over to peruse the wall decor section (which was 50% off that particular week!) & found a rectangular wooden sign that already said 'Bon Apetite.' As much as I would have loved to hang that sucker up in my kitchen, I decided it was the perfect size & shape for my project, & it was already equipped with  a way to hang it! This was a bit pricey. It helped that it was half off, & I justified it by telling myself that it would be a nice touch to add to our future home's decor. 


I knew I wanted a slightly distressed look for the sign, so I mosied over to the acrylic paint section & picked up some crackle finish. The type that I got went on top of my paint. Last, but certainly not least, I also grabbed some antiquing finish & headed home. 


Our engagement session was outside in the height of a brutal, muggy Tennessee summer. Instead of fighting it... I decided to embrace it & wanted a playful, slightly Americana feel for our pictures. That idea was my inspiration for our Save the Date sign. I chose to paint it a basic cream (that went best with the colors we were going to be wearing). It took 3-4 layers of paint to get a nice even coat over the whole thing. You could still faintly read 'Bon Apetite' under the base layer, but once I was finished, it wasn't visible anymore. After that dried, I applied the crackle. (For this I just followed the instructions on the bottle.) The crackle I had went on your topmost layer & was supposed to crackle down to your bottom layer. Since I had to use so many layers of cream paint, it didn't really crackle down to the base. Never fear, because that's where the antiquing finish comes in! 


Once again, my printer wasn't working. So for the text, I taped together two pieces of printer paper & worked out my design on that in pencil. I just guestimated where everything needed to go & it turned out pretty well! But, for those of you who need things to be a little more exact, I'd suggest using a ruler to measure out where your words are going to go. Now, you need to get your design onto your freshly painted & crackled board! I took the cheap route & scribbled on the back of my paper with a pencil so I could transfer it. An easier way would be to buy graphite/transferring paper to lay under your design as you trace it. I also recently found out that good ole newspaper can also work as transferring paper. I have yet to try that out, but if anyone does, let me know how it works! I definitely suggest taping your paper to your board while your tracing it, so simplify your life & help free up your hands. After I carefully traced & transferred my text, I took a black paint pen & went to town filling in my design. Be very careful during this stage & do not, I repeat do not, shake your pen over your board because you'll get a nasty mess that is tricky to clean up. Take it from the girl who almost had a meltdown from doing this. :) 


After you have your text looking just how you want it, let it dry thoroughly. (I use a blowdryer to help speed up the drying process, because I suffer from a bad case of having limited to no patience.) After its nice & dry, break out your antiquing medium. I used a similar process with this as with my Deer Painting minus the damp paper towel. A dry paper towel is more than enough to wipe off any excess, & if you use a damp one it will take your writing off, too. Here is where the crackle detail really comes out! 
Detail of the crackle. 
I was super happy (& still am!) with how it turned out. This project ended up costing me a little more than I had originally expected - probably upwards of $40. But, I didn't mind, because it was for my engagement pictures after all! And the whole reasoning behind it was to use it in a picture for our actual save the date cards. Since we are only temporarily in Virginia & in a fully furnished apartment, I don't have any of my home decor stuff out, but I can't wait to make a wall collage of some of our engagement & wedding pictures with this sign!


Our save the dates!
If you like our engagement pictures, be sure to check out Emily Lester Photography! She's amazing!! http://emilylesterphotography.com/index2.php#/home/

Wednesday, February 15, 2012

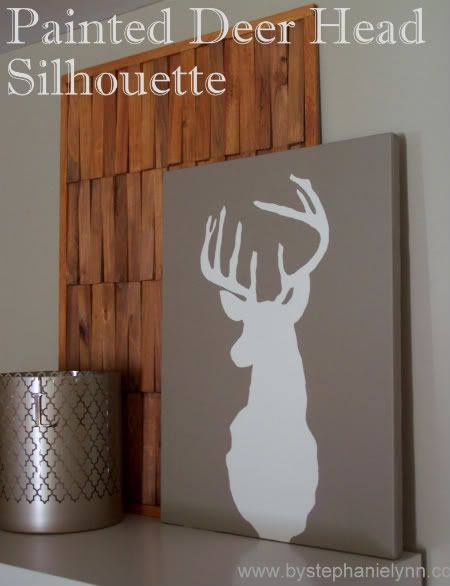
Rustic Deer Silhouette Painting

Micah is probably the hardest person to buy gifts for, besides my dad. Both of them are infuriating. If there's something they want, either: A. I can't afford it (a watch for 2 grand?!) or B. They get it before I get the chance to. So I've had to rely on my creativity for their presents. For the past few holidays that me & Micah have celebrated together, I started painting things for him. Now he's gotten to the point where he just straight up asks for a painting. So, as I was pondering what I was going to get him for our 1st Valentine's Day as Mr. & Mrs., my mind automatically went to the spare canvas I had laying around from a past project (I got the cheap-o ones that came in a 2 pack from Hobby Lobby & only needed 1). 


I was perusing Pinterest (I could write a whole post on how much I love that site.) a while back & came across this post. 


As I've previously established, Micah is extremely outdoorsy. Not to mention, he keeps threatening to put up dead & mounted animals everywhere, so any way that I can give him a deer head, but on my terms is perfect!


First, I found a deer head silhouette online that I liked. I couldn't get the printer to work (Don't judge me, at least I'm admitting how technically un-savvy I am.), so I just free handed the design straight onto my blank canvas with a pencil. Of course this would be the perfect time to show you a picture of my deer in its free handed greatness, but, as I mentioned in my 1st post, I forgot to take pictures during the process. If you don't feel comfortable free handing stuff, I suggest printing out the image you want & getting it blown up to your preferred size, then using transfer paper (also called graphite paper) to get it onto your canvas. (I saw this paper at Michael's in the acrylic/craft paint aisle, & I know Hobby Lobby has it, too.) 


I picked green for my background because its Micah's favorite color, & it seemed nature-y & manly. It took for freaking ever quite a few layers of paint to get the background looking like a solid shade of green instead of a splotchy mess. Then, I started in on the silhouette. I squirted a thickish white paint & tan paint (both are acrylic, as is the green I used) directly onto the canvas, & mixed the two together as I painted. Do the same for smaller areas, like the antlers, but be careful to use very small dabs of paint. I like this method because it made the color uneven & textured, but if you want a more uniform look you might want to premix the paint or use just one color. 


This could also be a 'finished product' if you didn't want to antique it. 
Once everything was dry (this is VERY important) & how I wanted it, I took my brown antiquing finish & added it on top. Just like with the other paint, I squirted it directly on top of the canvas. I started moving it around with a sponge brush (go in circles), then rubbing it off with a paper towel. I also found it helpful to dampen another paper towel to remove some of the excess. You need to work pretty fast so the antiquing medium stays wet enough to wipe off


The left half has the antiquing medium on it, & the right half is still plain. 
Keep going until the whole canvas is done. After I had a nice base, I went back & darkened some areas, like around the edges & in the body of the deer. Just mess with it until you're happy! Try not to get too heavy handed with the antiquing... but, in case you do, that damp paper towel will be your BFF. 


Ta daaaa!
Since I had all of these supplies already on hand, this lovely Valentine didn't cost me a dime, & my hubby loved it! Please let me know what you think!


The paints I used. The green is called Arbor Green. 

Monday, February 13, 2012

Travel Map

I spent hours toiling over my blog... the name, the colors... I'm a bit of a perfectionist, unfortunately. So after I got all of the logistics worked out (thanks in part to my AMAZING best friends), I was so excited to get started posting! It was then that I realized that I had poorly documented my first two projects. I'm used to just jumping into a project right away (usually without a fully thought out game plan). I was so caught up that I forgot to take pictures as I was going! I feel like this is a serious DIY blog faux pas, & I am going to correct that for every other project... or at least try. That being said... I'm so excited to share what I've been working on!


Me & the hubs, also known as Micah, decided that we needed a way to document all of the places we have visited & hope to in the future. Micah is in the Army, so inevitably we are going to be traveling around a bit in the next few years. Aside from that, we both love to travel. Granted, his idea of a ideal vacation is shooting caribou out in Alaska, while mine is meandering through the Italian countryside. Yet, we still manage to compromise on most trips (We got to honeymoon in the Historic district of Charleston, SC!). 


Since a map of the entire world is a little too big & generic (some of the places we've visited aren't exactly major metropolitan areas), I decided on finding a map of the good ole U.S. of A. I was able to find a poster sized one at my local Michael's for around $8. Micah decided he wanted to help, & picked out a generic framed cork board from Walmart that was $10ish - He's ALL about the budget. We were able to find a board that was almost the exact size we needed to fit our map poster. The last 3 things we got were Elmer's spray adhesive (also from Walmart) & two packs of quilting needles, each in different colors. JoAnn's had a better selection of these. They were a little pricey - $5 for the small box & $9 for the big one, but I figured I could also used them for sewing. All together, the supplies for this project totaled around $35... not too shabby!


We sprayed the adhesive in small sections on the cork board, starting in one of the corners & lined it up along the interior of the frame. We had to spray A LOT, so make sure you do this either outside or in a well ventilated area. Don't be dummies like us & forget to open a window in your apartment until AFTER your living room is filled with fumes...just saying. It is also helpful to use a credit card or something similar to smooth the map down with. It helps cut out on wrinkles. We continued working our way across the cork board in small areas until the whole map was unrolled & (kinda) glued down. There was a little excess along the bottom, so I took a sharp knife (an exacto one would probably work better) & trimmed the paper off so that it matched up with the edge of the frame. Use the credit card to push any paper edged under the frame if need be. 


Let it dry & you'll end up with something like this!


Then, we started sticking the pins in. One color for places we've been & and another for places we want to go. Just be careful to not stick them all the way through the back of the board since they are really long. 


It is kind of bumpy looking because I don't think the glue was thick enough for the poster-y finish of the map. If I was going to do it again, I think I would try good old fashioned Mod Podge. But, if you do go that route you might want to test a small area instead of jumping straight in like I did. 


Originally, I was planning on something a bit fancier, but Micah wanted this to be something fun & personal, not a work of art (That's how he put it.). Still, I would like to try to find a cheap, more interesting frame to paint & put over the standard blah one. If I do I will let y'all know! Also, please let me know what you think!!

 
SITE DESIGN BY DESIGNER BLOGS